This will be a four part series giving you a step-by-step walk-through on how to:
- Create an MS Graph custom connector for groups
- Create an MS Graph custom connector for group members
- Create Procore API custom connector to GET all users
- Create POST Procore API to create a new user in Procore using Power Automate
What is Procore?
Procore is the #1 software dedicated to the construction industry. Procore enhances collaboration, safety, and communication in all aspects of the project life line from precon to closeout in one system.
Use case
Add users to Procore automatically as users are added to Azure AD, based on Microsoft E1, E3, E5, E5 with PSTN, E5 with PSTN and International Calling, and F3 licensing assignment.
Step-by-Step Guide
For our specific use case, we wanted to pull all Microsoft and Office Licensing group configured for group based licensing for all E1, E3, E5, and F3 licenses. Then retrieve all the group members to compare to users in Procore when adding new users via Power Automate.
STEP 1.
Develop the query in MS Graph to GET all Microsoft/Office license groups.
MS Graph can be accessed here: https://developer.microsoft.com/en-us/graph/graph-explorer
The query was as follows: https://graph.microsoft.com/v1.0/groups?$filter=startswith(displayName, ‘License – Microsoft’) or startswith(displayName, ‘License – Office’)
In our particular case, our group based licensing for Microsoft/Office started with “License – Microsoft” and “License – Office”. In your case it might be different. Adjust the query for your specific needs accordingly. Once you have the query you need:
STEP 2.
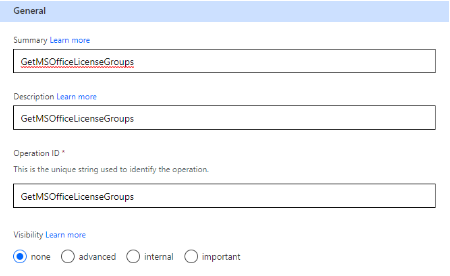
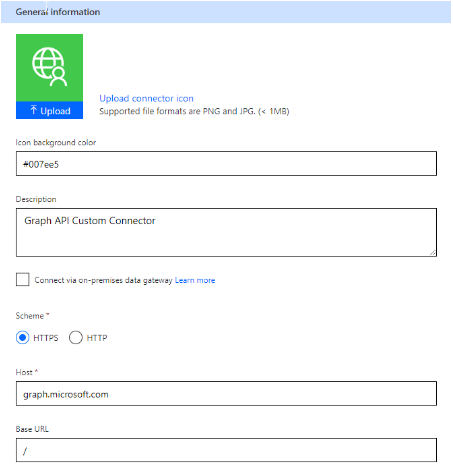
Create the MS Graph custom connector to GET Microsoft/Office License groups in Power Automate or Power Apps. I used Power Automate to create the custom connector as follows:
Create the MS Graph custom connector to GET Microsoft/Office License groups in Power Automate or Power Apps. I used Power Automate to create the custom connector as follows:
- Go to Power Automate design studio: https://make.powerautomate.com
- Data –> Custom connectors –> New custom connectors –> Create from blank
- General –>
4. Security –>
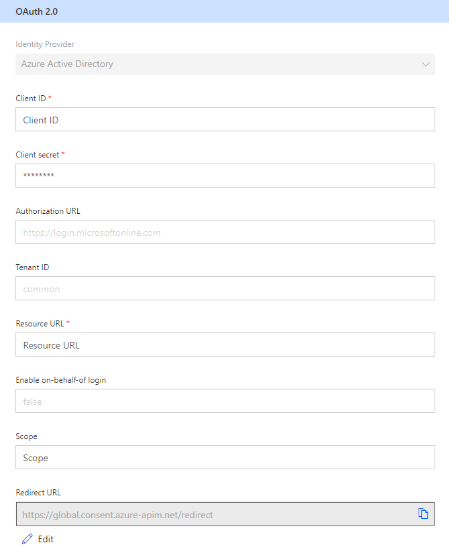
Enter Client ID, Client Secret, Authorization URL, Tenant ID, and Resource URL (https://graph.microsoft.com), all else defaults. When you click “Create connector”, Redirect URL will automatically be generated. NOTE: Information can be obtained from the Azure portal for the app registration you will need to create to access MS Graph API’s. This article will not cover creating the app registration in Azure. Instruction can be found here: Register a Microsoft Graph application – Azure AD B2C | Microsoft Learn
5. Definition –>